Showing posts with label Spring challenge. Show all posts

Monday, May 12, 2014

Gail's Challenge!

I had great fun thinking of Spring things to create and how to adapt the block. I hope it is fairly obvious what I have done as I'm not very technical and have no clue how to insert diagrams or even multiple photos!

It is a wall hanging for a hallway in our house. It is 125cm by 30cm. I have used made fabric trimmed square for the leaves. The Ladybird is made using your technique of pentagons as starters - the pentagons being the spots. It is quilted with wavy lines in silver thread to be like the Spring dew.

I took the photo on a patch of daisies, growing in the grass verge in between the road and pavement, outside our house.

Best wishes, Gill (London, UK)

Monday, April 21, 2014

Sophie's Spring Challenge - Turning the lines into Curves

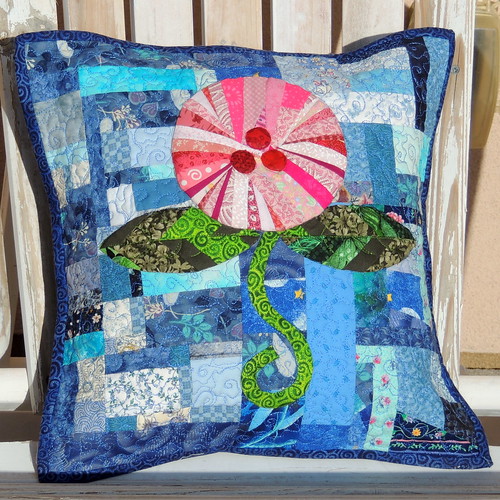
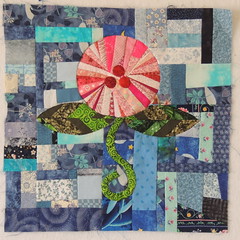
I started with Victoria's sketch and ended here, with this 14 inch pillow.

Spring Challenge - April's Lovely Finish

Design Notes

Sophie's Modern CLover #1
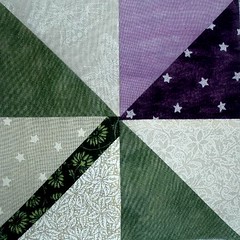
When I saw Victoria's sketch, I immediately thought of this block, for which I had written a block pattern for the April 2011 Block Lotto. My first thought was to make a small quilt using this block, using made fabric for the triangles, but decided that, instead, I wanted to try something new.

I started wondering what it would look like if I turned all the straight lines in the sketch into curves.
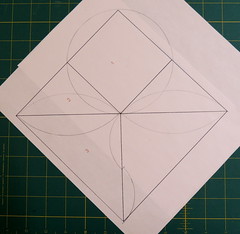
The Idea

(You might have to squint, or click to enlarge,  to see my penciled curves and circle.)

I also decided I want an on-point orientation.


Construction Notes


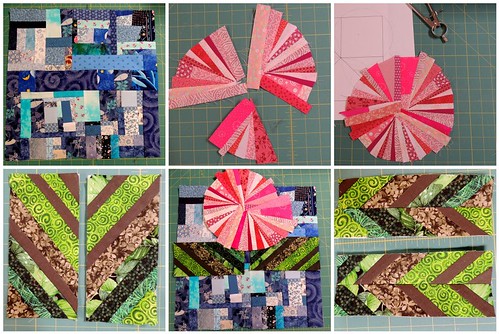
I had some smallish squares of blue made fabric which I sewed together to form the 14 inch background and some tiny pink strings that I pieced into a vaguely circular shape.  The green fabric for the leaves was foundation pieced onto muslin. 

Made Fabric Mosaic

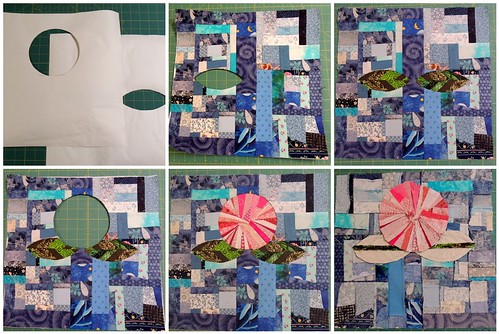
I used Dale Fleming's 6 minute circle technique to inset and sew the leaf shapes and the circle bloom into the background.  I had sewn simple circles (with 1-fabric background and 1-fabric circles) using this technique, but wasn't sure it would work with the additional bulk of using made fabrics. I also had never inset anything with points, like the leaf shapes.

Because the circle bloom overlapped the leaves, I created two templates (from freezer paper) and made them as large as the background, to help me keep it all aligned.   First I inset the leaves, one at a time because they met in the center,  then added the circle.  I wasn't sure that my sewing machine was going to like sewing through the many layers of made fabric and the glue that was holding everything together, especially at the bottom of the circle, where I was sewing the circle into the leaf/background seams.   Since it was a first for me, I took lots of photos of the process.

Construction Mosaic

The last photo in the mosaic above shows the wrong side.  I didn't really know that this technique would work, but it did, the first time, with no ripping and re-sewing.  I was amazed ... and will definitely keep using it in future projects. 


With Applique Added
The curvy stem was added by hand appliqué of a bias strip. Since I wasn't happy with the center of my string-pieced circle, I also added three circles by hand appliqué (a US dime was my template).

Since I knew it was going to become a pillow, I used a plain muslin fabric for the back ... which makes it easy to see the good, bad and the ugliness of my quickie free motion quilting.

After it was quilted, I turned it into a pillow by added a plain fabric lapped back and binding the edges.

And then it was ready for it's day in the morning sun.


Thanks, Victoria, for another interesting challenge.  I tried something new, advanced my skills with sewing inset shapes, and I truly had fun playing.

Friday, April 18, 2014

Spring Challenge that keeps on growing!

Hi all! I wanted to share how I started my Spring Challenge and where it's headed after a fantastic sewing day on Wednesday.

I attended a Liberated Medallion Quilt workshop with Gwen Marston this past week and couldn't decide what to bring as my center medallion. Then I remembered the Spring Challenge--perfect!
Here's my piece in progress--under the photo I'll share the novel and other photos as to how I got here.

With a tight timeframe (I began piecing the night before the workshop!), I played around a bit in Illustrator first to figure out what I wanted to do. While I like the star concept, the third design spoke to me so quickly that I didn't even bother to spend time coloring it in.


I had these larger cuts of fabrics pulled from a recent shopping trip to take to the workshop:

So I pulled scraps in those colors and got to work on my made fabric: teal, green, red, and gold. Because I'd added in a few lines to Victoria's original shape, I decided to paper piece the blocks instead--so much easier! (And...I often skimp on fabric when paper piecing--the beauty of paper piecing made fabric is that if your fabric ends up short, you can just add to it--woo hoo!)

I made four blocks to join with sashing:


Here's my original Spring Challenge piece, before it grew too much:

Watch it grow:

Liberated borders:

I loved this workshop and can't wait to continue playing with this piece as it grows--definitely have plans to work in some more made fabric as I add borders. 

Keep thinking spring and eventually it will get warm, right?!?!


Parts dept.

 Playing in the PARTS DEPARTMENT!

During my 15 minutes classes, I teach the peeps their Y seam construction... Remember when we did that on this challenge (click here)

So... I have all these little starter samples below... Aren't they cute? Random willy nilly blocks, and so I thought... Well, what If I turn them all into tulips!

Great idea, but...I now want my Skies to all be BLUE!
So guess what?
I have to remake ALL my Y seams!  hehehe!

Gluten for punishment!! (and I Y seemed the green part below as well... They do get easier and easier! Go for it!


Loving my little spring garden...

ACHOO!
Yep... NYC is full bloom today....

Happy Easter!

Thursday, April 10, 2014

Spring Challenge Finished

I had lots of trouble resolving this little quilt and in the end just wanted to get it finished.  I liked the layout of the original block in these first two pics but did not like the leaves.  Originally each leaf was a different fabric and fused on because I was unhappy with my applique skills. Not liking the leaves, I tried making them all the same.  


Then I tried my second preferred layout both with
the different fused leaves and with all the same leaves.  I opted for the different leaves but not being happy with the fused look, tried machine applique around each one.  I didn't like that either.

After some thought I removed all the leaves and settled on four fabrics for the leaves and hand appliqued them.  Here's the final quilt with a self-facing.  Ah-hhh!
                                    
                                     HAPPY SPRING EVERYONE!


Tuesday, April 8, 2014

Spring Challenge Progress


It has taken me awhile to decide how to progress with this little quilt.  I didn't like my first attempt to add made fabric to set the initial block on point.  After some unpicking I decided to go with some of my bright made fabric.  The outer border is made of 4" squares joined together.  This block is now 19 1/2" square.  Perhaps it will sit for a few more days now before I get some inspiration to continue.

Monday, April 7, 2014

Playing Among the Tulips

It's been a while since I have posted here.  A reminder to myself I need to play more.  At my last retreat I took a little time to play.  Creating several pieces of made fabric.
I had made one of these tulips before and knew I needed to make more.  I have a plan forming in my mind and I can't wait to bring it to fruition.  It includes the tulips, some orphan blocks and lots of scraps.

I hope to share more soon.

Thursday, April 3, 2014

Flower power, play!


Doing my own little PLAY over here, on the flower spring challenge.... Before I sew anything together, I'm trying all my options...
Here is  a possibility... Now what if I repeat it and see who that looks?
I'm looking for something unexpected to happen when I play.... So far, I'm not seeing it.. But by doing this, I do see some elements I like here, with in the watt he scraps have fallen, which leads me to my next idea to try. I can incorporate them in the next one that I make...
More to come!

Would love to see more of your PLAY! I'm off to Cleveland to teach at the Original Quilting & Sewing Expo. Maybe I will see some of you there!
~ Victoria


Saturday, March 29, 2014

Spring Challenge Top

I don't know what possessed me to make 9 of these blocks, other than delight at finding a purpose for some little purple HST units that have been hanging around looking to be put to use.

The scrappy aqua background blocks are constructed from some HST squares that were made for something else a while back, then pulled off the design wall when the result did not live up to expectation. So happy to have found a use for them here, even if they are now unrecognizabl.


I'm not a big fan of sashing, usually, but this one needed it.

My original plan was to make a scrappy border from large chunks of some lovely coordinating Amy Butler prints from the scraps bin, but wasn't thrilled with how it was shaping up, so I went shopping instead. The green Kaffe print is perfect, with all the same shades of green as in the flower blocks, and even a little lavendar to spice it up.

There are a few other projects ahead of this one in the ready-for-quilting pile, which gives me time to ponder how to quilt it. This will finish at around 38" square by the time it's been quilted and trimmed and bound.

Friday, March 28, 2014

Redbud Sighting


My favorite time of year in Northern Virginia is about two weeks from now.  While thousands travel to see the stately Cherry Blossoms, I love driving the highways and coming upon a small glimmer of redbuds growing wild along the roadside.  Their color is so brilliant; gray and brown of winter still dominant with only a smattering of pale spring green seen.  Because we drive so fast here, the sight is gone almost as soon as it is seen.

Below you can see the parts of the block that began with the block Victoria posted.  I have wanted to depict this fragile time of spring for a long time but it wasn't until I added the gray and brown that I could see the effect I wanted.  Victoria said to try something new, so I "deconstructed" the block and added more pieces.  Then I added the flowers with a fancy stitch from my machine -another first for me!


Below is a picture I made with the Paint program on my computer.  I thought I was going to add brown and gray around the block to represent the woods and the road, but at this time, I think keeping it small as seen in the first picture above works better.


Thursday, March 27, 2014

Spring Challenge Progress

Before I begin to applique the leaves
(my skill definitely needs improvement),
I need to decide how to sew these blocks together.


Tuesday, March 18, 2014

Spring Challenge

My Spring Challenge quilt was inspired by a greeting card designed by Sybille Lichtenstein.  Perfect colors to remind you of a spring day.
Victoria's pattern is in here, it's just buried below the appliquéd daisy.  I lost my points when I added the blue strip, but I'm happy with my progress so far.

Spring Challenge


Following Margaret's lead, I have been playing around with my favorite spring flowers.  I love all Flowering Dogwoods, but the Kusa Dogwood is especially lovely.  This is my abstract version thus far.
More to come....

Sunday, March 16, 2014

Spring Challenge


Progress so far on my spring challenge.   I used made fabric for the blue background.  This was from a piece that I cut into for the word challenge.  I adapted the pattern by adding the green wedges to each of the triangles.   Now to decide where to go from here.  I think I will turn it on point - something new for me.

Spring Challenge

Today I had a chance to play around with
the Spring Challenge block.
Since nothing says Spring to me more than flowers
I plan on using four of the blocks to make
a 12" mini with blooms.
Maybe I'll choose one of these layouts:

Thursday, March 6, 2014

SPRING Challenge!


Here we go! A new challenge!!! SPRING!!!

I am purposefully not showing you MY PLAY, as I want YOU to be inspired and find your own path… These are the bones of the new challenge… Your job is to push the limits and change at least ONE thing about this block and make something related to spring... Read on.


Cutting:

#1 - Cut a 3 1/2" square
#2 - Cut 3 7/8" square and cut once on the diagonal for 2 triangles….
#3 - Cut 7 1/4" square and cut on the diagonal twice for 4 triangles, ( you will use two.)

Makes a 6" block


THEME: SPRING!


CHALLENGE:
1. MUST Include "Made fabric" somewhere in the block.

2. How can you take this block, and change at least ONE thing about it?

How to do that?  (stretch your design sense)
Questions to ask your self:

Can you adapt the blocks?
Can you change the sizing?
Can you turn the blocks on point?
Can you add to the block?
Can you change the block design subtly?
Can you add elements?
Can you play with the quilting?
Can you add a new technique that you haven't' done?
Can you turn it into a medallion?
Can you add embroidery?
Can you applique?
Can you use this as a starter element and make it into something even grander?
ETC….

These are all ideas to start pondering and playing... how you can turn this block into a SPRING themed quilt.

3. Any size.. mini, or larger… no limit...Whatever inspires you!


Inspire us! 
4. Post your work and progress here! 

Show us what your doing! 
That's what we love about this site.
(for those who have posting rights on the 15minutes site)

LABEL your posts as "SPRING CHALLENGE"


Or  add to the FLICKR group

Or, you can email me and I will post it, (email image and your text, do not put in doc. or pdf.)

*NOTE: I will be away March 16-27 (so I won't be posting during that time, or answering emails)


5. Deadline: June 1st, 2014
I will find some prizes to give out at the end for a few pieces… Just to keep it extra fun!

ARE YOU IN? 
Comment and begin!