Showing posts with label made fabric. Show all posts

Monday, April 21, 2014

How Does Your Garden Grow

I've made a few more tulips since my last post on this project.  Added some daisies as an alternate block.
I ran out of make fabric and had to make me some more.

So I could make more tulips.

So my garden can grow.


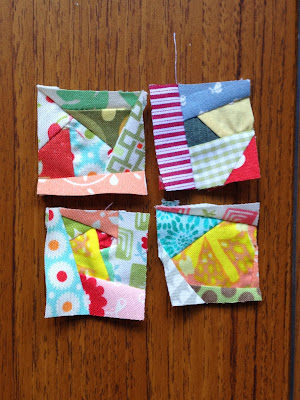
Saturday, February 15, 2014

Heart Challenge


Here's my heart so far. I really enjoyed picking out my favorite reds for this challenge.  I was going to cut my heart freehand but decided to go "grade school valentine style" and folded the fabric in half and then freehand cut it with the rotary cutter.
This is my first try hand applique (it's in progress). Since it's not perfect, I may look for a way to disguise it with ribbon and other embellishment.  I am sewing it on by hand because the applique got all wonky and squished when I machine stitched on my "word" project.
I never thought that I would like hand sewing but I am! It's one of those things I said I would never do, but I have a hexie quilt in the works (and it's fun although I don't understand why).  I am now even willing to finish a quilt binding by hand! I may miss the end of February deadline but I will finish this and share it. 
Kudos to Victoria for giving us the kernel for projects that push us to try new techniques and develop skills.

Saturday, December 7, 2013

Mini's - Now I Get It

I have to admit - I like working in mini - I always have a postage stamp quilt in the works and I like making fabric but I wasn't having that much fun putting them together.  I wasn't feeling the giddy joy that Victoria was describing.  That bothered me.   A lot.  As my mini was going together, I wasn't loving it.  That bothered me even more and I shelved it.  To all the folks that completed theirs - I salute you.  You Rock!!! and your mini quilts are awesome!!!

I went to Whiting Mills in Winsted, CT yesterday.  Victoria was teaching her 15 Minute class at Jackie Kunkel's studio, Canton Village Quilt Works!  It was a great day.  I made my first Lemoyne Star and got to buy Victoria's Auriful thread which I am looking forward to using!

Victoria's quilts are stellar and get this, they are even better in person.  It's true.  We all know how photos don't catch the nuances.  If you get a chance to go to a class with V - go!!!

When she showed us techniques, little light bulbs went off in my head.  Little nuggets of gold.  My mojo for my mini squares came back.  I realized a critical error on my part.  I was lining up outside edges of fabric and sewing my 1/4" seams there.  There's no reason to do that except that I probably didn't want to squander any precious fabric (because when you're done, your cuttings from these squares are too small for anything).  When I got home and played for 15 minutes last night - I got happy and giddy and completely addicted to the mini's - as advertised...


Sunday, November 3, 2013

Progress - 15 minute style

I decided on a red background instead of white - because it's dark and seemed more fitting.
Plus, I love red and have wanted to see what this looked like for a long time.
Making the 9 patches with mini's was very time consuming and this is about an hour's work.


I have to feed the patches in slowly so they don't go all wonky.  Sometimes they did that anyway and sometimes they got completely stuck.  That's when this came in handy.  A stiletto.  Does anyone else have this in their bag of tricks?


So, this little quilt is still developing and maybe take a wild turn yet...stay tuned!  More next week-

Wednesday, October 23, 2013

Itsy Bitsy's

I have to admit - I am just a little bit jealous of y'all.
I love what I see and it makes me want to sew so badly...But, all I have been able to do so far is sort through my scrap bin and pick out the smallest yummy bits.


I had already started sewing my itsy bitsy's together awhile ago - unknowingly...see the piece in the middle?
For inspiration I have turned to a few resources: Japanese blocks, 100 Quilt Blocks book and Making Quilts with Kathy Doughty of Material Obsession, the last one being particularly inspirational.

Creativity awhirl inside my head - I will just have to bide my time for my 15 minutes to play properly !!!  :)

Sunday, September 22, 2013

New Machine Cover

YEA!!!  Just finished a cover for my sewing machine using made fabric.  I had originally planned on making a large pillow for my couch with some of this fabric, but inspiration struck and well, there you have it.  A new cover for my sewing machine.


This was so much fun to make.  I love making my own fabric and seeing what I can do with it or trying to figure out how to use it creatively.   My next big project is to pull out my color blocks, make the three I haven't made yet and put them into a quilt top.  I think I have the perfect setting fabric to put the blocks on point.   I will post them as soon as I figure out everything and get it done.  Hmm, now that I am thinking about it, I have another one I need to work out the logistics on and finish up - it was the made fabric blocks challenge.  I have all the blocks made, just need to figure out the sashing -  I have one row done, but I really want to do uneven sashing and it has been sitting on the sidelines until my brain can figure out how to do it the way I want.  
color challenge block


some of the block challenge blocks


Tuesday, April 2, 2013

TTC: made-fabric border - part 1

{posted by Stephanie}
I've begun turning several slabs of orange, right-angle-seamed "made fabric" (process pics and notes in my previous post, here) into a pieced border for my Tea Towel Challenge WIP.

First, using the 45-degree angle line on my 6x24" ruler, I cut 4" diagonal strips from the MF slabs. This turns all those right-angle seam lines on-point, which is the desired effect:

Then I used my "Easy Dresden" ruler to cut fat wedges, like so:

You could free-hand cut tumbler shapes and it would work equally well and be slightly more wonky. I decided to start with some element of regularity as this is going to get wonkier as we move along. I cut a bunch of these, but did not use all my made-fabric. Some remains in larger pieces for a later step.

At this point I gave in to a nagging impulse to add a little of my favorite "neutral" to balance out all this orange and liven up what will be the outside edges:
(Yes, I just called chartreuse a neutral. Let's not quibble about that, shall we?)
The fat ends of the tumblers got sewn to a nice long strip, spaced about an inch apart for trimming:
You might wonder why not do this earlier, before cutting the tumblers, but a moment's reflection will confirm that would put the contrasting strip on the fat end of half the tumblers and on the narrow end of the others. Fine for some other purpose, but not what was wanted here.

Finish the tumbler pieces with a flip and press:

... then trim the addition to continue the tumbler side angle:

I'm using the Easy Dresden to trim because it was already at hand; any straight-edge ruler will do just as well for this step.

Here's a teaser of what's coming up next:
 
This is where the wonky will happen. Stay tuned for part 2...


Saturday, March 30, 2013

A long way from done

There was never any hope that I'd meet the Tea Towel Challenge end date of March 29, given how late I jumped in, but that's not stopping forward progress. Here's where things stand with my "tea-towel-ish" WIP:

First steps: Fused the original panel to some lightweight woven interfacing, trimmed all sides to square up and more closely center the image, and added some framing strips:

That blue-gold print has a lot of metallic detail, and introduces a little bit of contrasting color to balance what will be a mostly orange piece.

Here's the full thing at this stage. It's showing signs of not wanting to be a medallion layout. We'll see how it goes.


The orange fabric beside it is my touch-stone print for a made-fabric border that will range lighter/darker, brighter/duller, redder/yellower, without straying too far in any of those directions. I'd no idea, until a deep rummage through all sizes of scraps was done, how many orange/brown fabrics were in there!

My "made fabric" is all right angles , inspired by the grid-like motif that forms the panel background. Made like so:

1) Cut a heap of strips. These are mostly 1.5" and 1.75" wide:

2) Find strips of similar length and sew into strata:

3) Cross-cut and resew into sections like this:

4) Which get assembled into fabric like this:


5) Which will be re-cut for a pieced border when I get another slab or two like this one made.

I have a plan for that border, but it is subject to change. More pics to come...


Friday, January 4, 2013

It's all her fault...


If it hadn't been for Victoria, NONE of the following would have / could have happened.  I'm not blaming you, V.,  just pointing out how influential you are. (smile)

Once upon a time, in the year 2012,  a "long" time ago in this cyber age, Victoria introduced Triangles Galore.  I was hooked and made about 32 blocks ( I haven't counted!).  For me the challenge was not to make small triangles of made fabric, though I did make three or four of those, but to figure out what wonderful color combinations I could put together in making the block. The pattern on the fabric didn't matter to me... just the color. Consequently I was able to use lots of different fabrics.  It certainly helped make a dent in the stash.

Over the holidays I decided to figure out how to finish up and make a flimsy.    25 blocks,  each 14 inches square, on point.  Hmmm.  That was the beginning of one BIG quilt.  So many fabrics in the center needed a similar collage to balance it, hence the BIG made fabric of the last post.  Each corner measures 51x51 inches with a 73" diagonal (or something like that.  I have described the process on my blog.

triangles galore and BIG made fabric  (102" x 102"
THANK YOU V!!!

Monday, July 23, 2012

And Kelly Makes Sixteen

I surprised myself by finding quite a selection of kelly green in my stash - some old, some new. When pulling fabrics, I thought "grass green". And what goes with grass? Sky blue, of course - and some bright pink and orange flowers, dandelions (haha), a couple of bugs, and a little dog too!
Completed Kelly Green block - each block is squared up with my 12-1/2" ruler, nice! One block a week, for 16 weeks - great way to get enough blocks for a quilt!
The Sweet Sixteen!

Saturday, December 31, 2011

Katherine's Double Pinwheel

Hello! I was so excited about another three-day weekend, I got busy and made Katherine's wonderful block, for the NEW'BEE group, right away. After the holiday busy-ness of last weekend, I'm enjoying a glorious weekend of sewing!

Great instructions, fun block - done!

Friday, November 11, 2011

Better Late Than Never!

I don't remember whether I shared these two made-fabric heart blocks I put together some time ago. My intention back then was to turn them into a Priority Quilt for the Alzheimer's Art Quilt Initiative for the 15 Minutes group effort. I kind of got stuck once the blocks were assembled.


Whatever magic that needed to happen finally did. Ta daa!


When I finished the binding and hung it up for the first time I realized there was a bit of a black hole in the upper right. That strip of green was calling out for embellishment. A trip to JoAnn Fabircs yielded the tiny hearts and flower buttons (and a massive reaction to the overpowering scent of cinnamon in the store).


I'm quite happy with it now. In fact, I'll be a little sorry to see it go!

Monday, October 10, 2011

Red, Camo, and Blue

Finally finished my camo block for Victoria's project. I made fabric for the red, light blue, and dark blue sections, and used pretty much all of the camo fabrics supplied by Victoria.


I chose one of Carol Doak's paper piecing patterns - this one is called Cross My Heart Block, and you can find it here.


Finished block, on its way to you today, Victoria. Thank you for the chance to participate in this project.

Sunday, September 25, 2011

NEW'BEE Block for October!

Hello! I am excited to be a part of the NEW'BEE, which starts this month!


Thank you in advance to all of the NEW'BEE players - and now here is my block request.


See how excited my doggies are?


Autumn says "back to school", back to basics, and in honor of that - I'm requesting a 9-patch block - and the extra made fabric too, if you please!


First, create a piece of "made" fabric approx. 12" x 12" from one bright color group - think blues, greens, pinks, fuscias, purples, oranges - no yellows or tomato reds please. Above, see my made fabric all of oranges. From this fabric, cut 5 squares at 3" x 3".

I plan to make a quilt with a combination of patchwork and applique - and would like to use the extra made fabric for the applique - hence the size of made fabric requested.

From one piece of a contrasting fabric, in the same color choices, cut 4 squares at 3" x 3". This fabric should be a print, or something like the batik shown. The 4 contrast squares don't all have to be from the same fabric, as long as the color is similar (all purple, e.g.).

Assemble 9-patch block. Sew each horitontal row together, pressing the seams towards the darker fabric, then sew the 3 rows together, and press to finish.

How many to make is up to you - one block, and the remaining made fabric would be totally fine. If you feel inspired to make another, it can be with the same fabrics/colors

Finished block, ta da!

Thank you all!


Friday, August 5, 2011

More play time

After I made those little 4" border blocks using strips from my made fabric a few days ago, I decided to go ahead and make larger blocks. 

These are all 8" finished, cut down from a 10" block.  They really make up fast and I had so much fun playing with them, that I made 18 blocks at one sitting - I only stopped because I needed to make more large fabric sheets.  They really are a snap to make, my only challenge was deciding what fabric to use as a background.  I figure I must have really liked this fabric - a white and black sort of bubbly design - because I found two pieces of it in my stash. 

My opinion - playing is fun!

Linda

Monday, July 18, 2011

Churn Dash Fun

Yesterday I was so proud of myself.  I had 3 new pieces of made fabric and I was going to work on the BOM.  Well, I didn't have enough fabric so I had to cut the pieces rather than start with a 14" square as directed.  (Yes, I am pattern challenged!)  The instructions were great; my following of them wasn't.  I cut the strips 1/2" too short.  The whole piece does fit together, but if you look closely, the seams don't match : (  Oh well, mistakes are part of learning, right?!  I still like the finished product.   I'm sitting down to make some more fabric this morning to give it a go again!

Tuesday, May 31, 2011

Happy To Be Here

So happy to be able to post....


I'm new to 15 Minutes Play and have been enjoying myself.  This is the first quilt I made using made fabric.  It was my trial run for the 12 x 12 made from nothing swap.


I was fooling around in the sewing room yesterday and came up with this.  A Flying Geese Ring.  Question is....Now what do I do with it?  Any ideas? 

Saturday, May 7, 2011

Special delivery to me!

Wow - was I ever happy to open my mail today! My husband brought it in, and said I got an envelope that felt like it might have something of fabric inside....eeee! I opened it quick, and was so happy when I pulled out this beauty - I'm calling it Winnepeg Sunshine, by Brenda (of Scraps and Strings). As I already told Brenda, I loved it when I saw her post about it - and I loved it even more when I received it and saw it up close. Lucky me, Brenda also included a handmade (of fabric, of course) card, too!


I love the fabric mix, the lovely sunny applique, the great quilting, and of course the very very special hand beading. It is just perfect, and I love it. Thanks again Brenda!

Sunday, May 1, 2011

12 x 12 Swap Completed!

Yay, finally finished my 12x12 swap! Although I enjoyed making it, it took me many 15 minutes of play!!! I started with the general idea - curved geese, with a few "extra" geese trying to join the group! I made fabric for the geese, and paper pieced the geese a la Victoria (thank you!).


Then I made fabric for the lime background (my fave color), and curve-pieced the geese to the background. This will be going into the mail tomorrow, on its way to...??? Hope she likes it!

This was my first swap - thanks for doing this, V - great idea!


Friday, March 11, 2011

Accident --> Finish

Here's the piece I showed you yesterday, with a final HST border... I'm calling it the "Triumph Star." It's a little smaller that 36" square... a great size for my quilting practice.